BLOG

Tea Brucic Prizmic Tea Brucic Prizmic

How to cancel the subscription

To cancel your subscription follow the steps as shown below:

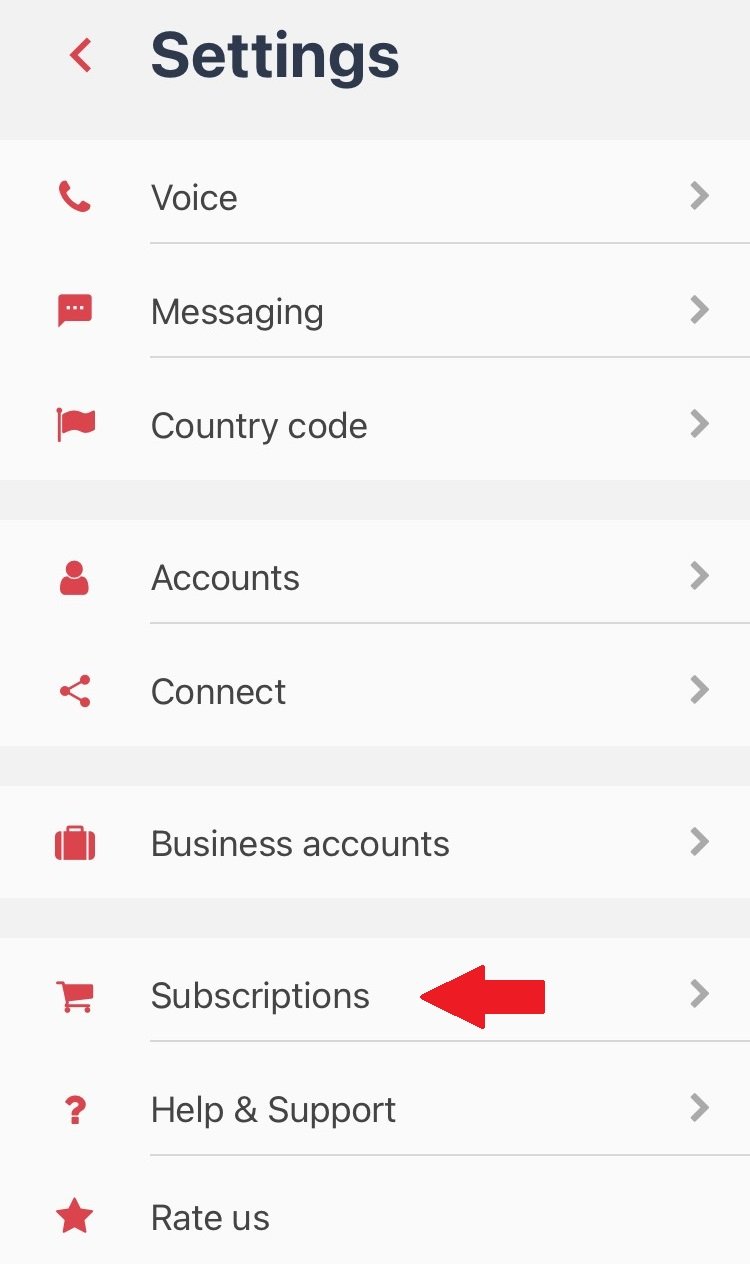
Go to Talkyto Settings -> Subscriptions

Tap Cancel subscription

Choose your option

Tap the link to your App Store and follow their instructions.

Read More
Tea Brucic Prizmic Tea Brucic Prizmic

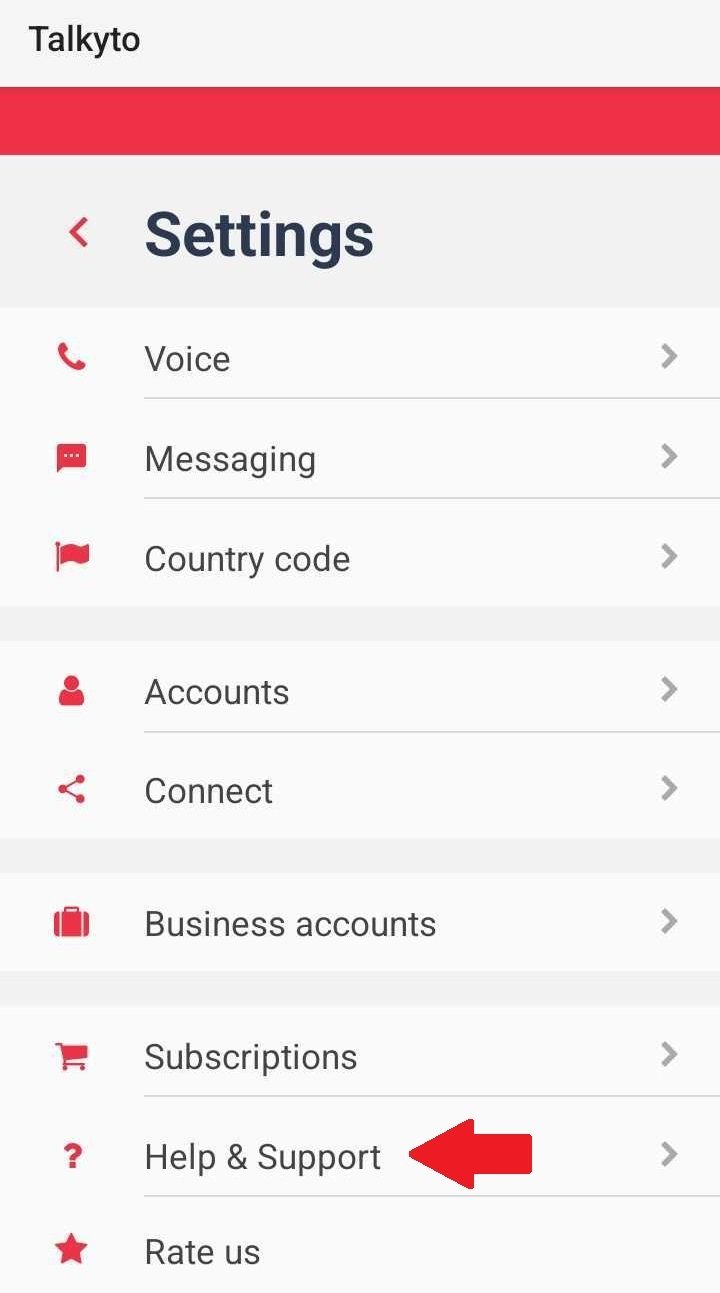
How to Locate Your Device ID - Talkyto Settings

Every device has a unique identifier, which is essential for troubleshooting and customization.

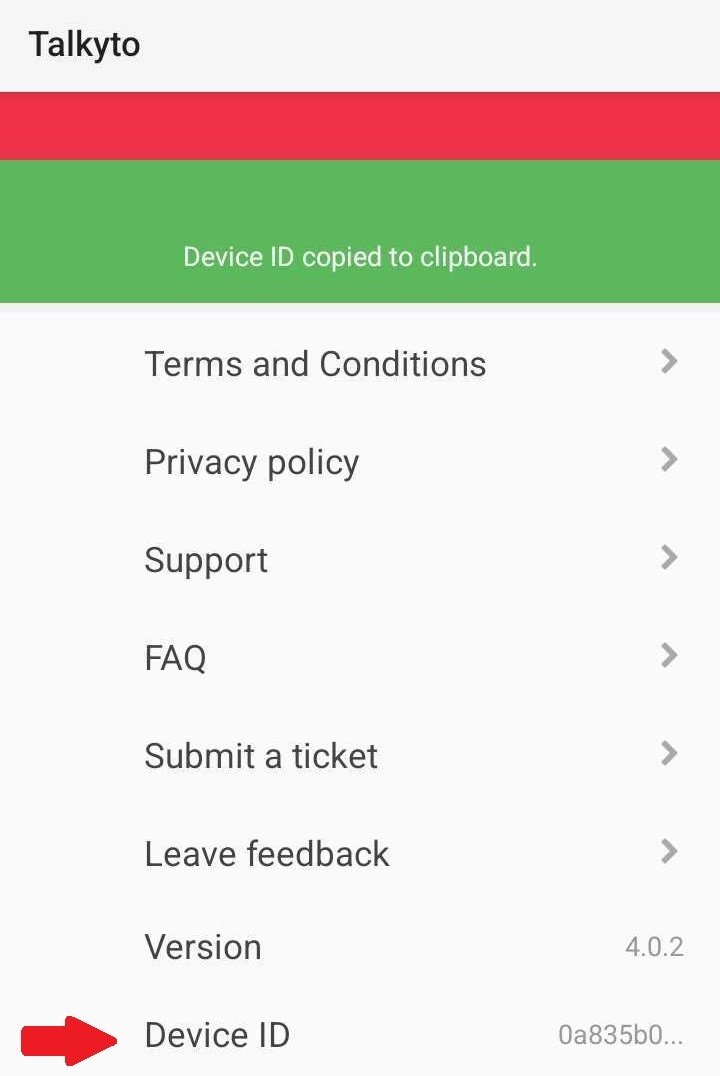
To find your device ID ( Android/iPhone), go to Talkyto Settings -> Help&Support

Android

and copy your device ID

Android

Android


iPhone

iPhone

Read More
Tea Brucic Prizmic Tea Brucic Prizmic

Talkyto setup

Step1 - Twilio

You need a Twilio account, purchased number, or verified caller ID on Twilio and Talkyto subscription.

Guide on how to get a Twilio phone number: https://support.twilio.com/hc/en-us/articles/223135247-How-to-Search-for-and-Buy-a-Twilio-Phone-Number-from-Console

Step2 - Subscription

After you have a number, start the Talkyto app and purchase a subscription plan.

Currently, we offer the following plans:

·       ALL: which includes receiving and sending calls, SMS, and MMS

·       MESSAGING: which includes receiving and sending SMS and MMS

·       VOICE: which includes receiving and sending calls

Step3 - Account connection

After you have purchased subscription, go to Settings → Accounts

and click on “Add new account”,

enter your Twilio SID and token to start using Talkyto for receiving and sending calls, SMS, and MMS via your Twilio account.

Step4 - Number setup

Go to Settings → Voice and set the default call number by clicking on the checkbox and radio button. Repeat this for Settings → Messaging, if you have the ALL or MESSAGING plan.

You are now ready to start receiving and sending calls, SMS, and MMS.

Read More
Docs Tea Brucic Prizmic Docs Tea Brucic Prizmic

Studio workflow integration - Voice

To receive Voice:

  1. Create Studio Flow if one isn’t already created

  2. Add “Add TwiML Redirect” Widget

  3. Connect “Incoming Call” from “Trigger” to the dot on the top of “Add TwiML Redirect” Widget

  4. Configure the Widget like this:

    1. Widget Name: Talkyto-voice (can be changed)

    2. URL: https://us-central1-twiconnect-257c6.cloudfunctions.net/receiveCall

    3. Request Method: POST

    4. Timeout: 14400 (can be changed)

  5. Save and Publish

  6. Go To Phone Number you want to configure and configure like this:

    1. Messaging Service: None (to remove a messaging service, click the link below the dropdown and remove the number)

    2. Configure with: Webhook, TwiML Bin, Function, Studio Flow, Proxy Service

    3. A message comes in: Studio Flow

    4. Flow: The Flow you created before

Read More
Docs Tea Brucic Prizmic Docs Tea Brucic Prizmic

Studio workflow integration - Messaging

To receive message:

  1. Go To “Explore Products”

  2. Select product “Studio” and open it

  3. Create Studio Flow if one isn’t already created

  4. Add “Make HTTP Request” Widget

  5. Connect “Incoming Message” from “Trigger” to the dot on the top of the “Make HTTP Request” Widget

  6. Configure the Widget like this:

    1. Widget Name: Talkyto-message (can be changed)

    2. Request Method: POST

    3. Request URL: https://us-central1-twiconnect-257c6.cloudfunctions.net/receiveSms

    4. Content-Type: Application/JSON

    5. Request Body: {

      "To":"{{trigger.message.To}}",

      "From":"{{trigger.message.From}}",

      "AccountSid":"{{trigger.message.AccountSid}}",

      "Body":"{{trigger.message.Body}}"

      }

      (if you are using Talkyto Additional Services, also add parameters needed for your additional service, these are only the parameters that Talkyto requires)

  7. Save and Publish

  8. Go To “Phone Numbers” product → “Manage” → “Active Numbers” and select the number you want to configure and configure like this:

    1. Messaging Service: None (to remove a messaging service, click the link below the dropdown and remove the number)

    2. Configure with: Webhook, TwiML Bin, Function, Studio Flow, Proxy Service

    3. A message comes in: Studio Flow

    4. Flow: The Flow you created before

Read More
Updates Tea Brucic Prizmic Updates Tea Brucic Prizmic

Talkyto v4.0.2

App updates, issues fixed

  • Redesigned write new message interface - now you can select one or more numbers either from your contact book or by entering phone number when writing a new message

  • Scheduled SMS - now you can choose a date and time to send one or more SMS.

  • Broadcast SMS/MMS - choose multiple recipients for SMS/MMS

  • Delete SMS messages

  • Moved Additional Services to be phone number specific

  • Bugfixes:

    • Fixed MMS file download

    • Fixed issues with account restore on app reinstall

    • Fixed Android notification link, now it takes you directly to message thread (ANDROID ONLY)

Read More
Docs Tea Brucic Prizmic Docs Tea Brucic Prizmic

Setting Up Additional Services ( ‘All’ subscription)

Additional Services feature explained

When setting up your, for example, CRM integration, please note that if you already have Twilio set to your chosen CRM and then proceed to enable Talkyto, you'll be presented with an option to add your chosen CRM as an Additional Service( for both Voice and Messaging).

Existing Twilio Application

Existing Twilio Application

However, if you haven't configured it in Twilio, you'll need to set it up manually as described below:


  1. Access Your Settings: Log in to your Talkyto account and navigate to the "Settings" section.

  2. Navigate to the Voice/ Messaging section: …based on your choice to include Voice, Messaging or both. Here you will find a list of your accounts and their associated numbers.

  3. Scroll to “Additional Services”: Click on Settings icon next to your default number, which will take you to the Voice/ Messaging configuration page. Scroll to the bottom of the page to access the ‘Additional Service’ section.

Additional services

4. Add New Additional Service: To start the setup process, click on "Add new additional service."

Section additional services

5. Retrieve Twilio Information: To obtain the necessary Twilio information, log in to your Twilio account. Once there, go to Twilio Phone Numbers, and select "TwiML Apps." Choose the relevant TwiML App and copy the required information.

6. Paste into Talkyto: Return to Talkyto and paste the Twilio information into the respective fields.

Your CRM

7. Save: Once you have filled in all the necessary details, click "Save" to complete the setup.

Successfully updated

By following these steps and referring to the accompanying screenshots, you can effortlessly integrate your CRM with Talkyto ( available for ‘ALL’ subscription), optimizing your business communications and ensuring a smoother workflow.

Try it out now and experience the difference it can make for your business!

Read More